Friday, August 12, 2011

More bracelets!

My sister came to visit and we made more fabric bracelets! We had a hard time finding a place to buy the bracelets but she found ID bands for beer bottles. The best part is that they're a lot smaller than regular bracelets like this so they fit our tiny wrists.

You can see the original post with tutorial here.

The original beer bands:

More bracelets!

We used random fabric scraps, an old pillow case and an old sheet.


Friday, July 29, 2011

I heart Spain

I had two pillows in my living room that needed new covers. First I made a peace sign pillow cover and meant to make this one soon after. Other projects have been getting in the way but I finally found time to make the second cover!

Supplies:
-Fleece 
-Felt
-Zipper
-Needle/thread


First I cut the fleece material down to size.
And sewed on the zipper.
Then I printed off a map of Spain and traced it onto the grey felt.
I cut out Spain and cut out a small heart from my red fleece.
I hand sewed the heart onto Spain.
I tried sewing it near where Madrid is located. It's...kind of close. 
I pinned Spain onto the blue fleece.....
....and hand sewed it on using grey thread.
 
All that was left was sewing the edges of the pillow case and shoving the pillow in.

Finished!  


Wednesday, July 27, 2011

Hamper

I saw this hamper on marthastewart.com and decided to make one.

We don't have room for a hamper anywhere in our bedroom and have been putting our dirty clothes in a hamper in the guest bedroom...which is annoying. This idea is perfect because it can hang on the back of our door and won't take up any room.

Supplies:
-Pillow case (I bought 3 at a thrift store for under $2)
-Embroidery hoop, 10'' diameter (from the thrift store - 39 cents)
-Fabric scraps


I decided to add two straps to hang my mine from since I didn't think one strap would be strong enough. We also already had two hooks on the back of our bedroom door so that worked out well.

I cut the material to make the straps. I used t-shirt material from my box of scrap material.

Then I sewed the ends together to make a loop. I overlapped the material by one inch.
I wasn't too concerned about the look but wanted the straps to be strong so I sewed three lines.
I put the loops around the embroidery hoop and put the hoop on the pillow case.
Then I hung it up!


Now we won't have our dirty clothes living in the guest room and have a nice, out of the way, hamper in our room. :-)

Monday, July 25, 2011

Another wedding date pillow

One of my amigas just recently got married (congrats!) so I made a wedding date pillow for her and her mate.

My original pillow and tutorial can be found here.

I made hers the same way but I made a square pillow and used a different fabric.

Friday, July 22, 2011

Inspired readers

This post is far far overdue.

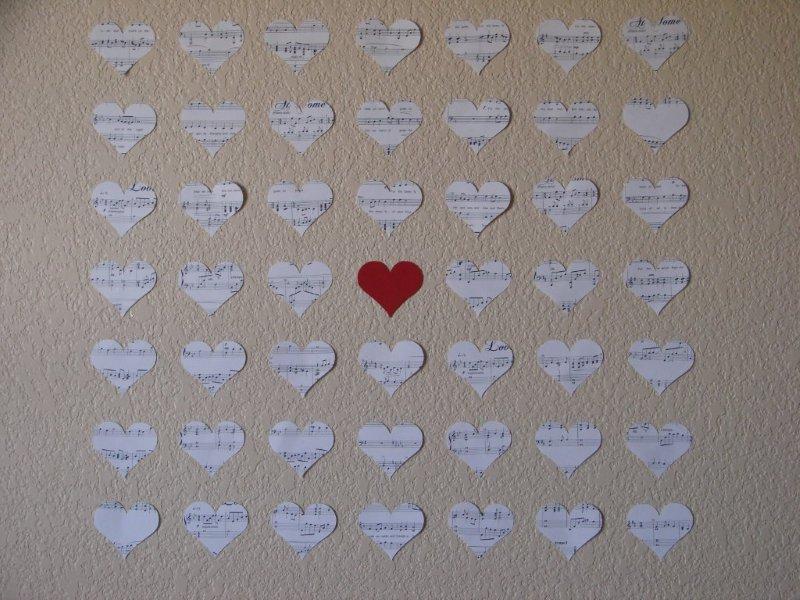
Two readers were inspired by my heart wall art and sent me photos of their projects. I'm too embarrassed to say exactly how long ago they sent me these photos...but it's been a while. 

And of course this post would have been great around Valentine's Day (since both readers did their projects for Valentine's Day...) but time has escaped me and here I am posting heart projects in July. The end of July :-)

Tonya created her own version of the heart wall art for her two kids.

For her daughter she did sheet music with a red heart in the middle. 
For her son - she printed off schematics for a computer and used a blue heart.
Here's a close up shot of the hearts.
Both of her kids loved their heart wall art!

Annette made a mini version in a photo frame. She used photos for the main hearts and then added a coloured heart. I love how the black and white photos look on the pink paper.


P.S. Have you made any of the projects that I've posted? If you have - I'd love to see them. You can send either photos or a link to a blog post. There's a "contact me" link in the upper left or you can just e-mail me at secretpieshoppe at gmail.com

Wednesday, July 20, 2011

Featured @ Polly Want a Crafter

Cassity at Polly Want a Crafter is featuring my sun shade today! You can see the post here.


Feel free to stop by and check it out along with all of the other great crafts features and posts on her site. She even has a link party every Monday.
 

Monday, July 18, 2011

Air Mail Curtain

I've been slowly working on my air mail curtain and am happy to say that it is done and I love how it turned out! Painting is not a skill I possess and is something I usually avoid doing (I even avoid just painting rooms in our casa) so I was very happy with the curtain. I only messed up the paint on one spot and, of course, it happened at the very end. N tells me no one will notice and I pretend to believe him. :-)

A while ago I posted about making the drop cloth curtain. For a recap, here is what it looked like before I painted it. As you'll notice in the end photos, the light doesn't shine through the curtain as much. We had thermal curtains that we used before so I used them as lining for the air mail curtain.
I thought that painting it to look like an air mail envelope might look neat. And if not...at least it'd be unique?

I created an image in PowerPoint.
Image details: 
The font I used is Fountain Pen Frenzy (which you can get for free on dafont.com).

The stamp was drawn by my ever-so-amazing mate. I found an image of a stamp with Queen Isabela on it and knew that there was no way I could paint that. I tried to change it in photoshop to a more drawable image but it wasn't working out. N offered to draw the stamp in a way that I could actually paint. I took him up on the offer and he came up with this.

Original stamp -----------------> Our stamp

(as you can see in the final curtain I did not paint the line under espaƱa or the lines around correos)

We taped the curtain to the wall, set up the projector and began to trace everything. We used a red coloured pencil for the red lines, a blue pencil for the blue lines and a regular pencil for the black lines.

Then I clamped it to a table and began to paint.
 And paint.
 And paint.
After days of painting (I had to let one area dry before painting another are so I was only able to do a section at a time) I finished!

As soon as the paint dried we bought it to the kitchen and hung it up. I love how it turned out and think it looks great in the kitchen.

All of the hard work and stressful painting = worth it! 
Close up details.


More photos of the completed curtain!

Thursday, July 14, 2011

Organzing the pegboard

This has been organized for a while...but I was busy working on the sun shade and apparently didn't have time to post.

We bought a pack of peg organizers at Home Depot and then bought a few extra pieces that we thought we'd need to go along with that. We found a pack of three baskets too - these work great for all of the random things we had or the things that are too small to hang (the smallest basket is full of tiny screwdrivers)


LinkWithin

Related Posts Plugin for WordPress, Blogger...