
I had some small scraps of material left over from my quilt and wanted to try to find a way to use them. I saw fabric flower earrings on Happy Together and decided to make them. I made them a little differently so here is how I made them.
Supplies: Earring backs, hot glue gun (or other glue), pearl beads (or other small beads), fabric scraps, small button to trace


First I traced the button on the fabric and cut out circles. You can see how tiny my scraps were - you don't need much fabric at all. This scrap, not even 3'' by 2'' made 10 circles.


You'll need 7 circles for each earring - 14 circles per pair of earrings.

The earring starts with one circle. This will be the bottom layer of the earring.

Fold two circles in half - with the right-side on the outside.

Put them on top of the bottom-layer circle - side by side so they completely cover the bottom-layer circle and create a circle of their own. Sew them onto the bottom-layer circle.I just sewed in two spots near the middle. You can use the same piece of thread to sew all of the layers on so make sure it's long enough.

Take the four leftover circles and fold them in half and then in half again, right-side facing out.

Place one on the earring circle and sew it to the layers (one full circle, two 1/2 circles) at the very point....this picture might make more sense.

Grab another folded circle and place it right across from the first one. Sew it to the earring layers at the point.

In the same way, sew the remaining two folded circles between the already sewen ones - so that all four 1/4 circles make one circle. Tie off the thread.

Now the tough part is done. Sew your pearl (or any bead) to the center of the flower.

The two finished flowers.

Next I used a hot glue gun to glue the earring backs to the back of the flower.

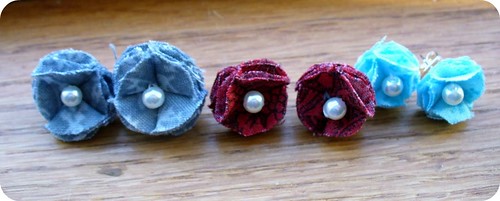
Three completed pairs! I used a dime for the grey flowers but thought it was too bit so I used a small button for the red and blue flowers and liked them much better.
Featured on:


Great tute! I will have to put this on my "to do" list. Thanks!
ReplyDeletePretty, Pretty!
ReplyDeletelovely... they're so pretty... i would love to make with different coloured fabrics.. so simple yet beautiful
ReplyDeleteSoooooo cute!!!!! Oh the patience you must have! I could see these cuties anywhere.
ReplyDeleteThanks for linking up to SNS!
FJ Donna
Very cute! Those would make great buttons too. Thanks for sharing this idea!
ReplyDeleteSo pretty, thanks for sharing and for linkin' up to Frugalicious Friday!
ReplyDeleteso sweet :)
ReplyDelete~ Emily N. from "too Blessed to Stress"
So cute! I love them. Stop on by and link up at my Thursday carnival Make it, Wear it!
ReplyDeleteLove them! I have some leftover fabric, too. I think I know what I'm doing this weekend!
ReplyDeleteThese are so so pretty! What a nice gift to give during Easter, eh?
ReplyDeleteThese are sweet...you certainly pay attention to detail!
ReplyDeletevery cute! great job!
ReplyDeleteVery cute, I have some earing backs and I'm going to give this a try.
ReplyDeleteThey are so cute and dainty!
ReplyDeleteThanks so much for dropping by Craft Schooling Sunday and posting this great tutorial! Hope to see you again next week. All the best, Sara
ReplyDeleteWay too cute! The flowers would make cute push pins too... Thanks for showing us how to make these!
ReplyDeleteThat is just beautiful!!! I love it! I'll for sure be featuring this in our Saturday Spotlight this coming week, at
ReplyDeletehttp://nv-craftenvy.blogspot.com/
These are super cute! What a creative idea!!! Thanks for linking
ReplyDelete=)
Looking forward to seeing you at Creative Jewish Mom next week.
ReplyDeleteI have a ton of scrap fabric, this is adorable! Thanks for sharing.
ReplyDeleteAdorable use of scraps!
ReplyDeleteThank you so much for linking up with the Talented Tuesday link party at My Frugal Family, which is hosted every Tuesday. Please feel free to stop back in every week and post your newest projects!
Very cute! I'll link this up tomorrow on my blog for my Daily DIY. Thanks!
ReplyDeleteThis comment has been removed by a blog administrator.
ReplyDeleteI will start with my fabric at home, this tips very useful. You are very talented, and very creative, will try to make improvement on this one.. ;)
ReplyDelete